Aditya Atluri, Advanced Micro Devices, Inc.
Masahiro Masuda, Ziosoft, Inc.
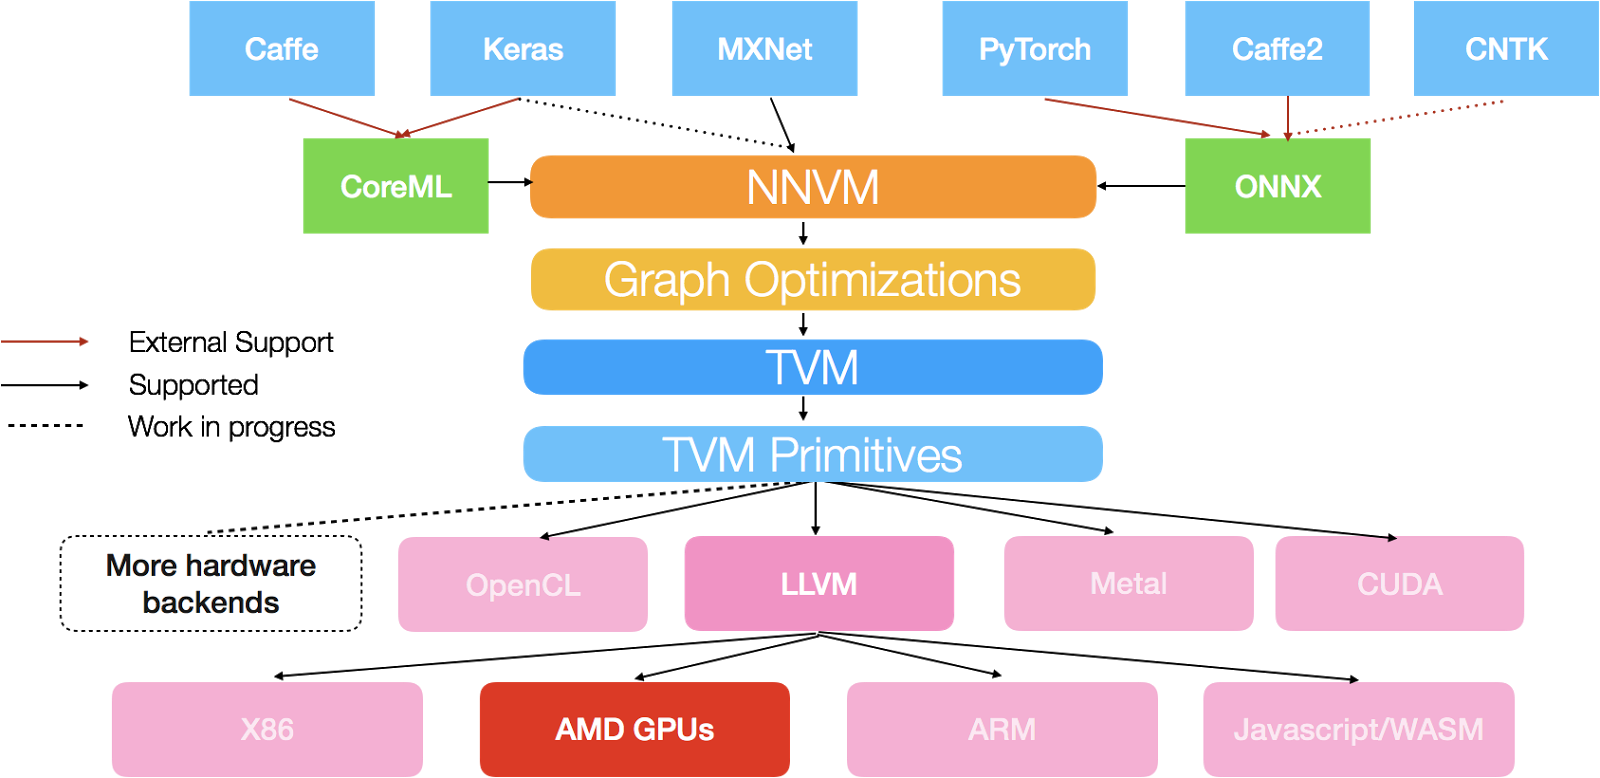
We are pleased to announce a new GPU backend for TVM stack - ROCm backend for AMD GPUs. If you are not familiar with TVM, you can refer to the earlier announcement first. In short, TVM stack is an end to end compilation stack to deploy deep learning workloads to all hardware backends. Today’s announcement focuses on the code generator support for AMD GPUs. Specifically, we developed a new GPU code generator for AMD GPUs. It compiles a high level computation description written in TVM frontend down to an optimized native GPU code. It achieves this using existing LLVM code generator in TVM and LLVM’s AMDGPU backend. We have also built a ROCm runtime for TVM to support native deployment of compiled ROCm modules. Thanks to the NNVM compiler support of TVM stack, we can now directly compile descriptions from deep learning frameworks and compile them to bare metal code that runs on AMD GPUs.
TVM stack is developed by an open source community under Apache-2.0 License. ROCm backend support is done with the help from community. Aditya first implemented codegen and runtime. He was later joined by Masahiro. Masahiro’s full time job is not related to TVM or AMD GPUs. Nonetheless, TVM got him excited and he has been involved in fixing bugs, resolving all failing unittests, and adding math function support to codegen.
ROCm stack
Radeon Open Compute is open-source initiative by AMD to leverage compute power of current and future generation GPUs. ROCm software stack is a great tool to express and run most commonly used GPU programming models and achieve peak performance. Not only ROCm is an open-source stack, it is an open stack, which means all the ISA and hardware features are well documented and programmable by developers. Developers can experiment with different programming models and try out multiple ways to achieve peak throughput and bandwidth for their algorithm.
TVM leverages the open-source feature of ROCm stack by using LLVM AMDGPU backend code generator. TVM translates from its intermediate representation (IR) to LLVM intermediate representation. This is the place where ROCm stack open-source feature takes control. TVM’s LLVM AMDGPU CodeGen pass converts LLVM IR into GPU assembly and object code, which is later called to run the whole network or group of layers or single layer.
On ROCm stack, there is no virtual ISA, you get what you ask for not less not more. Hence, one can schedule operations in a kernel at a granularity of a single instruction, without worrying about instruction reordering and other optimizations you do not ask for.
Using NNVM Compiler with ROCm backend
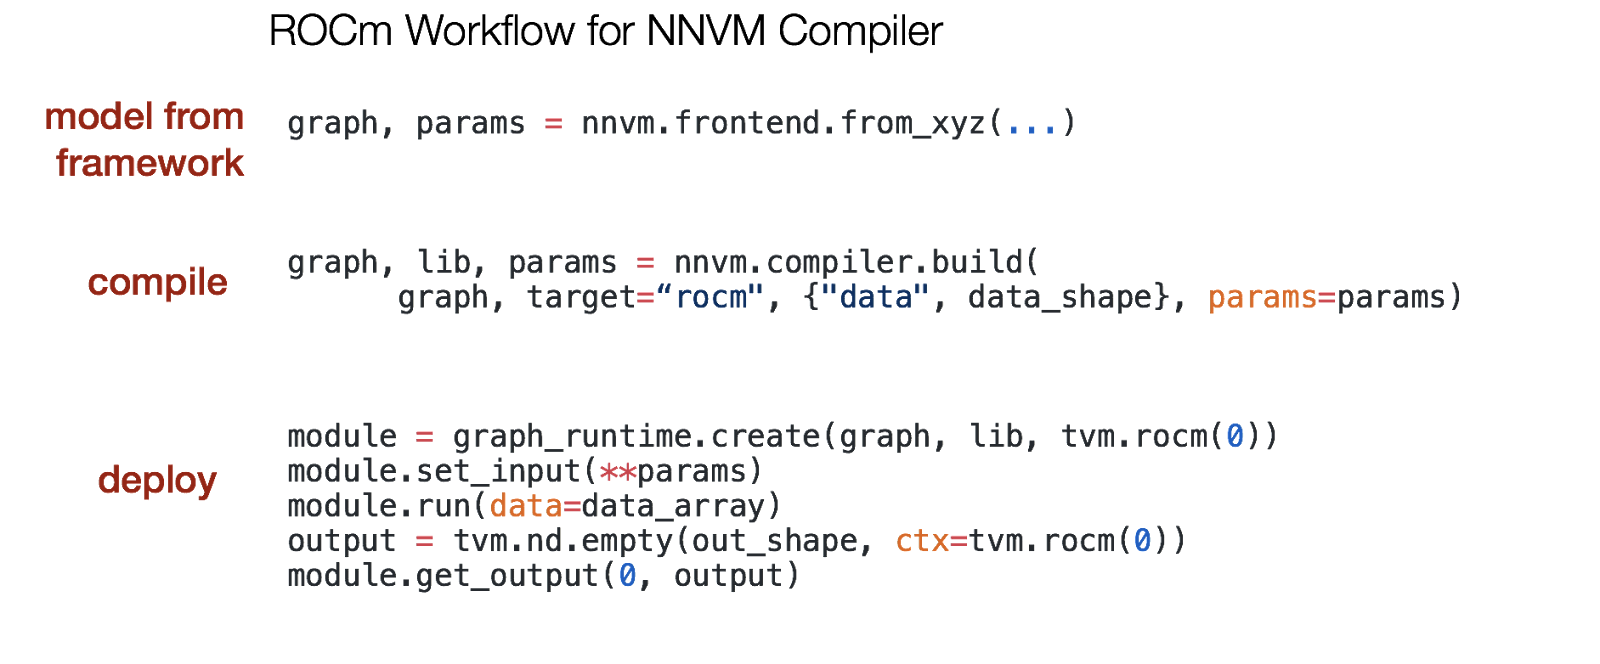
Thanks to TVM stack, we can directly compile models from popular deep learning frameworks such as MXNet and PyTorch into AMD GPU assembly using NNVM compiler, today. With ROCm backend, the generic workflow becomes as follows.
We have put together working examples of compiling models from MXNet and PyTorch with NNVM, and running them on AMD GPUs with ROCm backend. More frameworks are supported via the NNVM compiler stack. The repository is available here.
The script mxnet_imagenet_inference.py demonstrates Imagenet inference on AMD GPUs with recently introduced MXNet-Gluon model. It does the following:
- Loads Resnet 50 model from the Gluon model zoo
- Converts Gluon Resnet 50 model to NNVM graph format, using
nnvm.frontend.from_mxnet (...) - Compiles and executes the graph with ROCm backend
The example comes with an image of the following cat.

Running our network, it predicts this image as “tigar cat”, among 1000 categories.
$ python mxnet_imagenet_inference.py
Testing model resnet50_v1
x (1, 3, 224, 224)
TVM prediction top-1: 282 tiger cat
The script advanced_superres_onnx.py gives an example of loading a model trained with PyTorch. The model is stored in the ONNX format. In this example, our network takes an low resolution image as input, and outputs a 4x high resolution image. We refer the details of a problem setup and the network architecture to the original paper. The network has 37 convolutional layers, and thus it is far more complex than the simple 4 layer network in NNVM’s tutorial. Using the ONNX export interface in the latest Pytorch package, we exported a trained model available here to the ONNX format for use in this example. We thank the author of the repository for making his code and trained models publicly available.
In order to use models in the ONNX format with NNVM, we first use the ONNX library to load the ONNX model into the Protocol buffer object. We can then use nnvm.frontend.from_onnx(...) to obtain an equivalent NNVM graph. With a NNVM graph in hand, we can follow the generic workflow of compilation and graph execution outlined above.
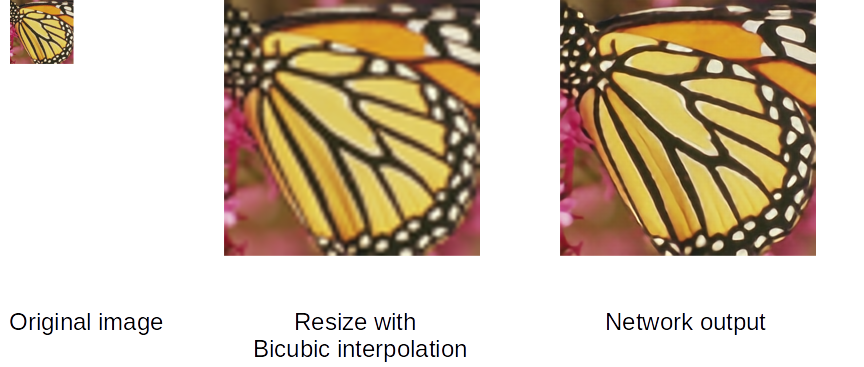
The input to the network is a 64 x 64 image on the left, and it outputs a 256 x 256 image on the right. On the middle is a 256 x 256 image obtained simply by resizing the input image with bicubic interpolation. The network outputs an image of far better quality.
The input images are taken from the original paper, and they are available here.
A Note on performance
The current support on ROCm focuses on the functionality coverage. We have already seen promising performance results by simply adopting existing TVM schedules for CUDA backend. For example, you can try running the gemm test script in the TVM repository and see the result. For two types of cards we tested, the current gemm recipe for square matrix multiplication (not yet specifically optimized for AMD GPUs) already achieves 60% to 65% of peak performance. This is already a promising start, as it is very hard to optimize performance to get to peak and we did not yet apply AMD GPU specific optimizations. We are starting to look at performance optimization and we expect more improvement to come.
Walkthrough of ROCm backend
In the following part of this article we focus on explaining how to use ROCm backend when working with TVM directly. All you need to do is to build your TVM function under the target “rocm” and create a runtime context for it. Here, we show an example of ROCm backend usage, following ‘Vector Add Example’ in TVM’s getting started tutorial.
We start by setting up a compute operation and a schedule for the vector add kernel. This step is independent of a backend.
from __future__ import absolute_import, print_function
import tvm
import numpy as np

n = tvm.var("n")
A = tvm.placeholder((n,), name='A')
B = tvm.placeholder((n,), name='B')
C = tvm.compute(A.shape, lambda i: A[i] + B[i], name="C")
s = tvm.create_schedule(C.op)
bx, tx = s[C].split(C.op.axis[0], factor=64)
s[C].bind(bx, tvm.thread_axis("blockIdx.x"))
s[C].bind(tx, tvm.thread_axis("threadIdx.x"))
Next, to use ROCm backend we build our kernel under “rocm” target. This will cause TVM to use our new code generator. We also need a runtime context for ROCm backend.
target = "rocm"
fadd_rocm = tvm.build(s, [A, B, C], target, target_host="llvm", name="myadd")
ctx = tvm.rocm(0)
After building the kernel and setting up a runtime context, we can launch our vector add kernel.
n = 1024
a = tvm.nd.array(np.random.uniform(size=n).astype(A.dtype), ctx)
b = tvm.nd.array(np.random.uniform(size=n).astype(B.dtype), ctx)
c = tvm.nd.array(np.zeros(n, dtype=C.dtype), ctx)

fadd_rocm(a, b, c)
np.testing.assert_allclose(c.asnumpy(), a.asnumpy() + b.asnumpy())
We can view LLVM IR that TVM generates in the following way:
dev_module = fadd_rocm.imported_modules[0]
print(dev_module.get_source("llvm"))
You should see something like this:
; ModuleID = 'myadd__kernel0'
source_filename = "myadd__kernel0"
target datalayout = "e-p:32:32-p1:64:64-p2:64:64-p3:32:32-p4:64:64-p5:32:32-i64:64-v16:16-v24:32-v32:32-v48:64-v96:128-v192:256-v256:256-v512:512-v1024:1024-v2048:2048-n32:64"
target triple = "amdgcn-amd-amdhsa-hcc"


; Function Attrs: nounwind
define dllexport amdgpu_kernel void @myadd__kernel0(float addrspace(1)* noalias nocapture, float addrspace(1)* noalias nocapture readonly, float addrspace(1)* noalias nocapture readonly, i32) local_unnamed_addr #0 {
entry:
  %4 = tail call i32 @llvm.amdgcn.workgroup.id.x()
  %5 = tail call i32 @llvm.amdgcn.workitem.id.x()
  %6 = add nsw i32 %3, -127
  %7 = ashr i32 %6, 6
  %8 = icmp slt i32 %4, %7
  br i1 %8, label %if_then, label %if_else


if_then:                                          ; preds = %entry
  %9 = shl nsw i32 %4, 6
  br label %if_end.sink.split


if_end.sink.split:                                ; preds = %if_else, %if_then
  %.pre-phi = phi i32 [ %21, %if_else ], [ %9, %if_then ]
  %10 = add nsw i32 %.pre-phi, %5
  %11 = add nsw i32 %.pre-phi, %5
  %12 = sext i32 %11 to i64
  %13 = getelementptr inbounds float, float addrspace(1)* %2, i64 %12
  %14 = load float, float addrspace(1)* %13, align 4, !tbaa !2
  %15 = getelementptr inbounds float, float addrspace(1)* %1, i64 %12
  %16 = load float, float addrspace(1)* %15, align 4, !tbaa !6
  %17 = fadd float %14, %16
  %18 = sext i32 %10 to i64
  %19 = getelementptr inbounds float, float addrspace(1)* %0, i64 %18
  store float %17, float addrspace(1)* %19, align 4, !tbaa !9
  br label %if_end


if_end:                                           ; preds = %if_end.sink.split, %if_else
  ret void


if_else:                                          ; preds = %entry
  %20 = sub nsw i32 %3, %5
  %21 = shl nsw i32 %4, 6
  %22 = icmp slt i32 %21, %20
  br i1 %22, label %if_end.sink.split, label %if_end, !prof !12
}
We can also view GPU assembly that ROCm backend generates. This is the real code that runs on your GPU.
print(dev_module.get_source("asm"))The assembly should look something like this, omitting unnecessary details:
        s_load_dword s1, s[4:5], 0x18
        v_mov_b32_e32 v2, -1
        v_mov_b32_e32 v1, 0
        s_waitcnt lgkmcnt(0)
        s_add_i32 s0, s1, 0xffffff81
        s_ashr_i32 s0, s0, 6
        s_cmp_ge_i32 s6, s0
        s_cbranch_scc0 BB0_2
        v_sub_i32_e32 v1, vcc, s1, v0
        s_lshl_b32 s0, s6, 6
        v_cmp_lt_i32_e32 vcc, s0, v1
        v_mov_b32_e32 v2, 0
        v_cndmask_b32_e64 v1, 0, -1, vcc
BB0_2:
        v_cmp_ne_u32_e32 vcc, 0, v2
        v_cndmask_b32_e64 v2, 0, 1, vcc
        v_cmp_ne_u32_e32 vcc, 1, v2
        s_and_b64 vcc, exec, vcc
        s_cbranch_vccnz BB0_4
        s_lshl_b32 s0, s6, 6
        v_mov_b32_e32 v1, -1
BB0_4:
        v_cmp_ne_u32_e32 vcc, 0, v1
        v_mov_b32_e32 v1, s0
        s_and_saveexec_b64 s[0:1], vcc
        s_xor_b64 s[0:1], exec, s[0:1]
        s_cbranch_execz BB0_6
BB0_5:
        s_load_dwordx2 s[2:3], s[4:5], 0x0
        s_load_dwordx2 s[6:7], s[4:5], 0x8
        v_add_i32_e32 v0, vcc, v1, v0
        s_load_dwordx2 s[4:5], s[4:5], 0x10
        v_ashrrev_i32_e32 v1, 31, v0
        v_lshlrev_b64 v[0:1], 2, v[0:1]
        s_waitcnt lgkmcnt(0)
        v_add_i32_e32 v2, vcc, s4, v0
        v_mov_b32_e32 v3, s5
        v_addc_u32_e32 v3, vcc, v3, v1, vcc
        flat_load_dword v2, v[2:3]
        v_add_i32_e32 v4, vcc, s6, v0
        v_mov_b32_e32 v3, s7
        v_addc_u32_e32 v5, vcc, v3, v1, vcc
        flat_load_dword v4, v[4:5]
        v_mov_b32_e32 v3, s3
        v_add_i32_e32 v0, vcc, s2, v0
        v_addc_u32_e32 v1, vcc, v3, v1, vcc
        s_waitcnt vmcnt(0) lgkmcnt(0)
        v_add_f32_e32 v2, v2, v4
        flat_store_dword v[0:1], v2
BB0_6:
        s_or_b64 exec, exec, s[0:1]
        s_endpgm
Links
- Github page of NNVM Compiler: https://github.com/dmlc/nnvm
- Github page of TVM: https://github.com/dmlc/tvm
- Examples of ROCm backend with NNVM: https://github.com/ROCmSoftwarePlatform/nnvm-rocm