![]()
The proliferation of low-cost, AI-powered consumer devices has led to widespread interest in “bare-metal” (low-power, often without an operating system) devices among ML researchers and practitioners. While it is already possible for experts to run some models on some bare-metal devices, optimizing models for diverse sets of devices is challenging, often requiring manually optimized device-specific libraries. And for those platforms without, say, Linux support, there exists no scalable solution for deploying models. Because of this, in order to target new devices, developers must implement one-off custom software stacks for managing system resources and scheduling model execution.
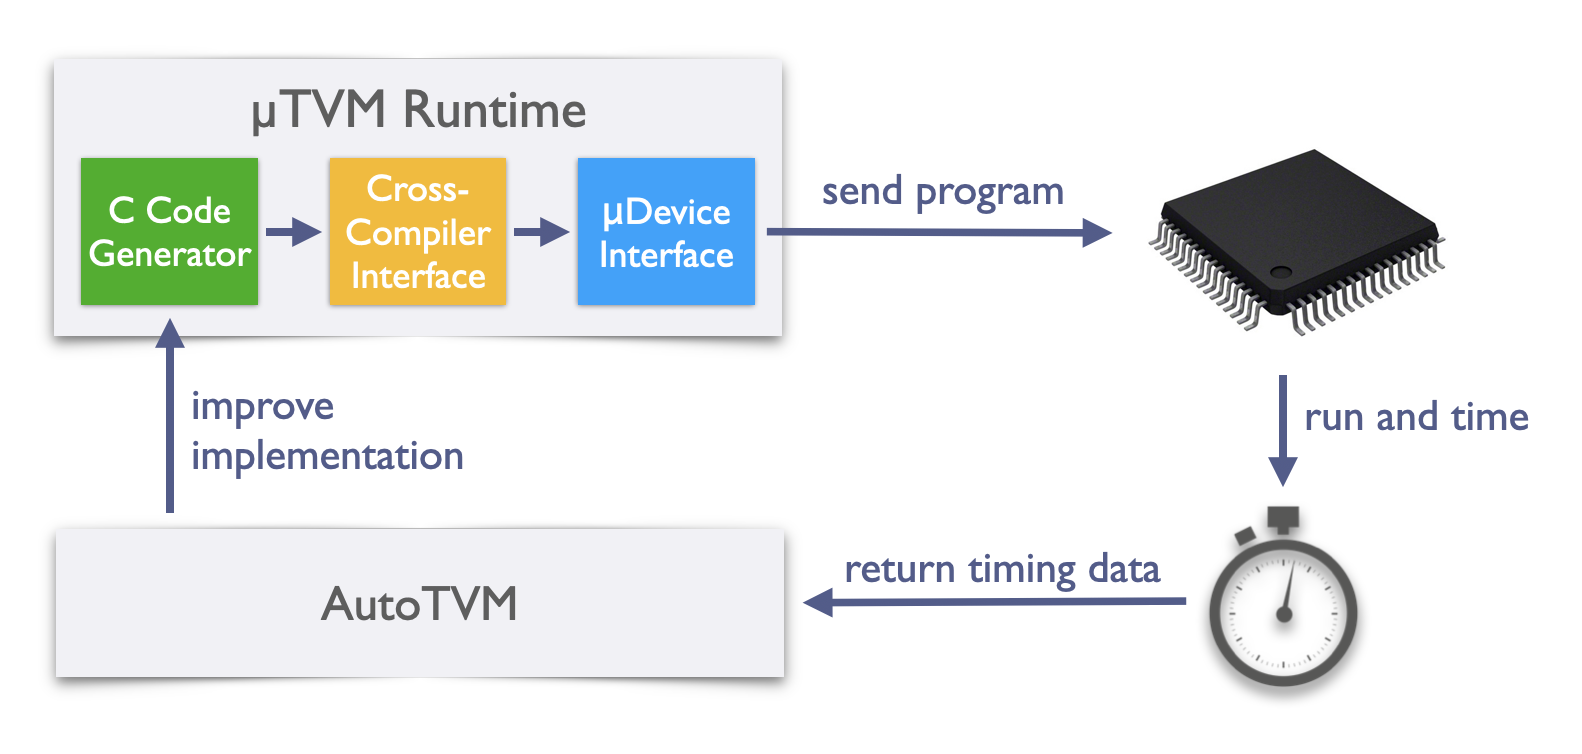
The manual optimization of machine learning software is not unique to the domain of bare-metal devices. In fact, this has been a common theme for developers working with other hardware backends (e.g., GPUs and FPGAs). TVM has proven resilient to the onslaught of new hardware targets, but until now, it couldn’t grapple with the unique profile of microcontrollers. To solve the problem in this domain, we’ve extended TVM to feature a microcontroller backend, called µTVM (footnote: pronounced “MicroTVM”). µTVM facilitates host-driven execution of tensor programs on bare-metal devices and enables automatic optimization of these programs via AutoTVM, TVM’s built-in tensor program optimizer. In the figure below, a bird’s eye view of the µTVM + AutoTVM infrastructure is shown:
Let’s see it in action
Before we talk about what TVM/MicroTVM is or how it works, let’s see a quick example of it in action.
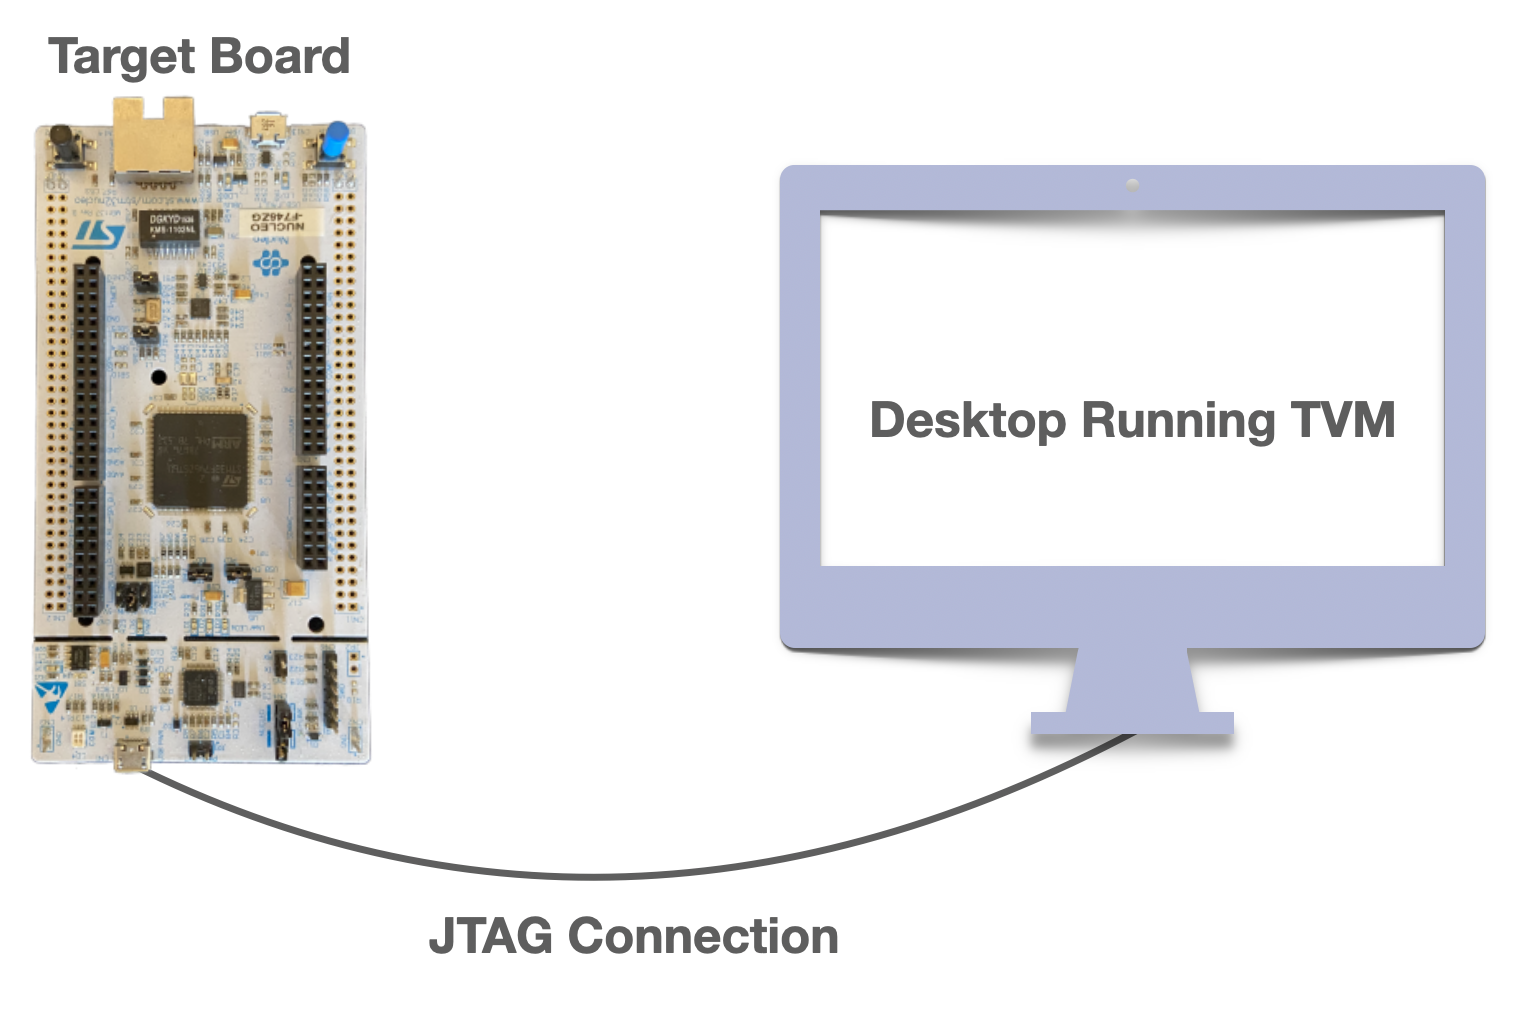
A standard µTVM setup, where the host communicates with the device via JTAG.
Above, we have an STM32F746ZG board, housing an ARM Cortex-M7 processor, an ideal part for AI on the edge given it’s strong performance in a low power envelope. We use its USB-JTAG port to connect it to our desktop machine. On the desktop, we run OpenOCD to open a JTAG connection with the device; in turn, OpenOCD allows µTVM to control the M7 processor using a device-agnostic TCP socket. With this setup in place, we can run a CIFAR-10 classifier using TVM code that looks like this (full script here):
OPENOCD_SERVER_ADDR = '127.0.0.1'
OPENOCD_SERVER_PORT = 6666
TARGET = tvm.target.create('c -device=micro_dev')
DEV_CONFIG = stm32f746xx.default_config(OPENOCD_SERVER_ADDR, OPENOCD_SERVER_PORT)

module, params = get_cifar10_cnn()
with micro.Session(device_config) as sess:
	graph, c_module, params = relay.build(module['main'], target=TARGET, params=params)
  micro_mod = micro.create_micro_mod(c_module, DEV_CONFIG)
  graph_mod = graph_runtime.create(graph, micro_mod, ctx=tvm.micro_dev(0))
  graph_mod.run(data=data_np)
  prediction = CIFAR10_CLASSES[np.argmax(graph_mod.get_output(0).asnumpy())]
  print(f'prediction was {prediction}')
Below are the performance results of MicroTVM, compared with CMSIS-NN version 5.7.0 (commit a65b7c9a), a hand-optimized library of ML kernels.
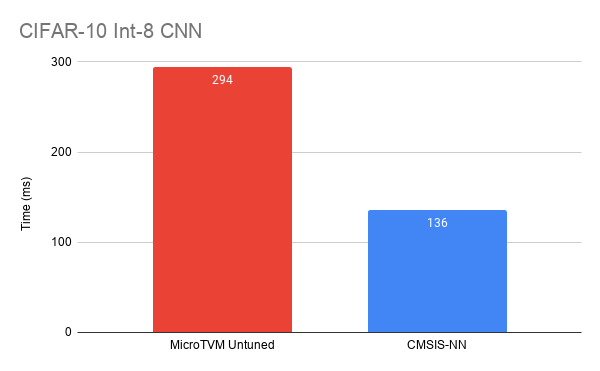
As we can see, the out-of-the-box performance isn’t great, but this is where AutoTVM comes to the rescue. We can write a schedule template for our device, do a round of autotuning, then achieve significantly better results. To plug in our autotuned results, we only need to replace this line:
graph, c_module, params = relay.build(module['main'], target=TARGET, params=params)
with these lines:
with TARGET, autotvm.apply_history_best(TUNING_RESULTS_FILE):
  graph, c_module, params = relay.build(module['main'], target=TARGET, params=params)
And our results now look like this:
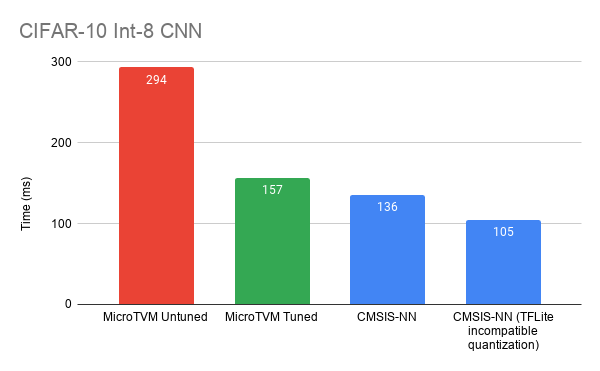
We’ve improved our performance by ~2x, and we’re now much closer to CMSIS-NN. Although the MicroTVM CIFAR10 implementation is competitive in with a similar TFLite/CMSIS-NN model, this work has just begun to take advantage of TVM’s optimization features. There’s room to optimize further by accelerating other operators such as dense/fully-connected and taking advantage of TVM’s model-specific quantization and operator fusion capabilities. TVM with µTVM enables you to play with the best of them. So how does it work? What’s going on behind the scenes? Let’s dive in now.
Design
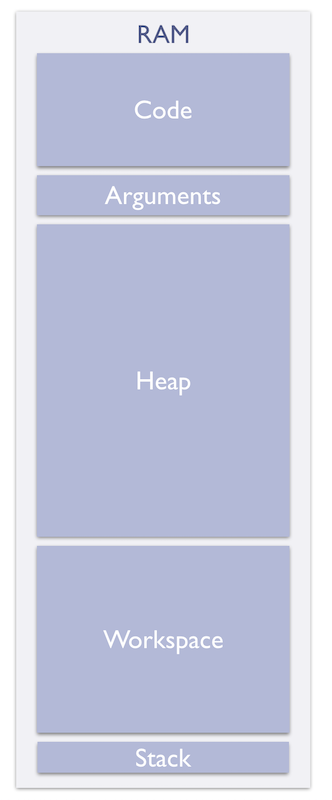
The µTVM Device Memory Layout in RAM
µTVM aims to support the lowest common denominator of devices by minimizing the set of requirements that must be satisfied. In particular, users need only provide:
- a C cross-compiler toolchain for their device
- a method for reading/writing to device memory and executing code on the device
- a specification containing the device’s memory layout and general architectural characteristics
- a code snippet that prepares the device for function execution
Most bare-metal devices have support for C and JTAG (a debugging protocol), so (1) and (2) usually come for free! Furthermore, (3) and (4) are often very small asks. Below are examples of (3) and (4) for STM32F746-series boards.
device_config = {
    'device_id': 'arm.stm32f746xx',        # unique identifier for the device
    'toolchain_prefix': 'arm-none-eabi-',  # prefix of each binary in the cross-compilation toolchain (e.g., arm-none-eabi-gcc)
    'base_addr': 0x20000000,               # first address of RAM
    'section_sizes': {                     # dictionary of desired section sizes in bytes
         'text': 18000,
         'rodata': 100,
         'data': 100,
         ...
    },
    'word_size': 4,                        # device word size
    'thumb_mode': True,                    # whether to use ARM's thumb ISA
    'comms_method': 'openocd',             # method of communication with the device
    'server_addr': '127.0.0.1',            # OpenOCD server address (if 'comms_method' is 'openocd')
    'server_port': 6666,                   # OpenOCD server port (if 'comms_method' is 'openocd')
}
.syntax unified
.cpu cortex-m7
.fpu softvfp
.thumb

.section .text.UTVMInit
.type UTVMInit, %function
UTVMInit:
  /* enable fpu */
  ldr r0, =0xE000ED88
  ldr r1, [r0]
  ldr r2, =0xF00000
  orr r1, r2
  str r1, [r0]
  dsb
  isb
  /* set stack pointer */
  ldr sp, =_utvm_stack_pointer_init
  bl UTVMMain
.size UTVMInit, .-UTVMInit
The µTVM infrastructure and device runtime have been built to only make use of these requirements, and we’re working to lessen these requirements by supporting common open source runtime platforms such as mBED OS to handle the compilation and linking processes.
Device Sessions
Given the networked nature of microcontroller interaction, we slightly deviate from standard TVM code by introducing the concept of MicroSession.
Every piece of functionality in µTVM relies on having an open session with the target device. If you’re familiar with TVM, you may have noticed a line of code that deviates from the norm in our first code snippet—-namely, this one:
...
with micro.Session(device_config) as sess:
	...
Every line inside this with block can call functions in µTVM, with the context being the device specified by device_config. This line is doing a number of things under the hood, so let’s unpack it.
First, it initializes a connection with your device, using whichever communication method you specified (usually OpenOCD). The µTVM device runtime is then cross-compiled, using whichever cross-compiler you specified. Finally, space for the compiled binary is allocated by the host, and the binary is loaded onto the device using the opened connection.
With the runtime now situated on the device, we’ll naturally want some functions to run through it.
Module Loading
One of the core abstractions in TVM is that of a module. A module stores a set of related functions for a particular device/runtime target. Given that microcontrollers don’t normally have operating systems, µTVM needs to do a lot of extra work to maintain this high-level abstraction. To see what’s going on, we’ll trace through the process of creating and loading a µTVM-compatible module.
Suppose we have a micro.Session open with our device and a TVM schedule that implements 2D convolution. If we want to load it onto our microcontroller, we need it to emit C code. To do so, we just need to set the target in either tvm.build or relay.build. Example:
graph, c_module, params = relay.build(module['main'], target='c -device=micro_dev', params=params)
By setting the target like so, the build process runs through our C code generation backend. However, the resulting C module still resides on the host machine. In order to load it onto the device, we run it through one of the core functions in the µTVM infrastructure: create_micro_mod. Example:
micro_mod = micro.create_micro_mod(c_module, DEV_CONFIG)
The line above cross-compiles the C source within the module, allocates room for the resulting binary (so it can coexist with the runtime in device memory), then sends each section of the binary to its allocated slot on the device. Once the module binary is snug in device memory, function pointers within the binary are patched to give the module access to helper functions in the device runtime (e.g., for allocating scratchpads).
Now, with our kernel loaded on the device, we can grab a remote handle to the convolution function like so:
micro_func = micro_mod['conv2d']
Tensor Loading
If we want to call an operator, we first need some tensors as arguments:
data_np, kernel_np = get_conv_inputs()
ctx = tvm.micro_dev(0)
data = tvm.nd.array(data_np, ctx=ctx)
kernel = tvm.nd.array(kernel_np, ctx=ctx)
Based on its data type (e.g., int8, float32, etc.) and shape, each tensor’s size in bytes is calculated, and the host allocates a region of memory on the device’s heap. The tensor’s data is then loaded into the allocated region.
Function Calls
Operator execution is perhaps the trickiest part of this system. To simplify its presentation, we’ll first cover strict execution (where operators are executed as soon as they’re called), then lazy execution (where operators are only executed once their results are needed)—-the latter is how the system actually works.
Strict Execution
When calling a function, both input and output tensors are passed as arguments, in what’s known as destination-passing style:
conv2D(data, kernel, output)
Given that these tensors are already allocated on the device, we only need to send metadata to the device (device address, shape, and data type), so it knows which of its resident tensors to use. The runtime representation of a function call includes this metadata, as well as the address of the function being called (shown below). Before constructing this representation, the metadata needs to be serialized into the arguments section on the device that exists expressly for this purpose.
/*
 * task struct for uTVM
 */
typedef struct {
  /* pointer to function to call for this task */
  int32_t (*func)(void*, void*, int32_t);
  /* array of argument tensors */
  TVMValue* arg_values;
  /* array of datatype codes for each argument */
  int* arg_type_codes;
  /* number of arguments */
  int32_t num_args;
} UTVMTask;
In the strict setting, there is a single global UTVMTask instance that we, from the host side, write into. Once we have written to the task, the runtime has everything it needs to execute the function, and we can begin execution at the runtime’s entry point. The runtime will perform some lightweight initialization, run our operator, then return control to the host.
Lazy Execution
In practice, executing operators as soon as the user requests to becomes prohibitively expensive, as communication overhead begins to dominate. We can improve the throughput of our system by delaying evaluation until the user wants the results of the call.
From an implementation standpoint, instead of eagerly serializing argument metadata and UTVMTask data, we now need to accumulate function call metadata on the host side, before flushing it to the device. The device runtime also needs a few changes: (1) we must now have a global array of UTVMTask and (2) we need to loop through and execute each task in order.
AutoTVM with MicroTVM
So far, the runtime we’ve described doesn’t seem very useful for model deployment, since it relies so heavily on a host machine. This is intentional, and the runtime has in fact been designed for a different goal: AutoTVM support.
In general, AutoTVM proposes candidate kernels, runs them on the target backend with random inputs, then uses the timing results to improve its search process. Given that AutoTVM only cares about single operator executions, we have designed the runtime to be operator-oriented, as opposed to being model-oriented. In the case of µTVM though, communication with the device will usually dominate the execution time. Lazy execution allows us to run the same operator many times without returning control to the host, so the communication cost is amortized over each run, and we can get a better idea of the performance profile.
Because AutoTVM requires rapid iteration on large numbers of candidate kernels, µTVM infrastructure only makes use of RAM currently. However, for a self-hosted runtime, we will surely need to make use of both flash memory and RAM.
The Hosted Graph Runtime
Although the hosted runtime was designed for AutoTVM, we can still run full models (as long as they don’t have any control flow). This functionality comes for free just by using TVM’s graph runtime, but with a µTVM context. In fact, the only reliance on the host with the graph runtime is for tensor allocation and operator scheduling (which is just a topological sort of the dependence graph).
Evaluation
With this infrastructure in place, we sought to answer the following questions:
- Is µTVM truly device-agnostic?
- How much effort is required to experiment with optimizations using µTVM?
To evaluate (1), we ran our experiments on two targets:
- An Arm STM32F746NG development board, featuring a Cortex-M7 processor
- The µTVM host emulated device, which creates a memory arena on the host machine that is interfaced with as if it is a bare-metal device.
To evaluate (2), we explore optimizations for the Arm board that give the biggest bang for your buck.
As a point of comparison, we pulled a quantized CIFAR-10 CNN from this tutorial by Arm. In the tutorial, CMSIS-NN (a library of highly optimized kernels by Arm experts) is used as the operator library, making this CNN the perfect evaluation target, as we could now directly compare the results of µTVM with CMSIS-NN on the Arm board.
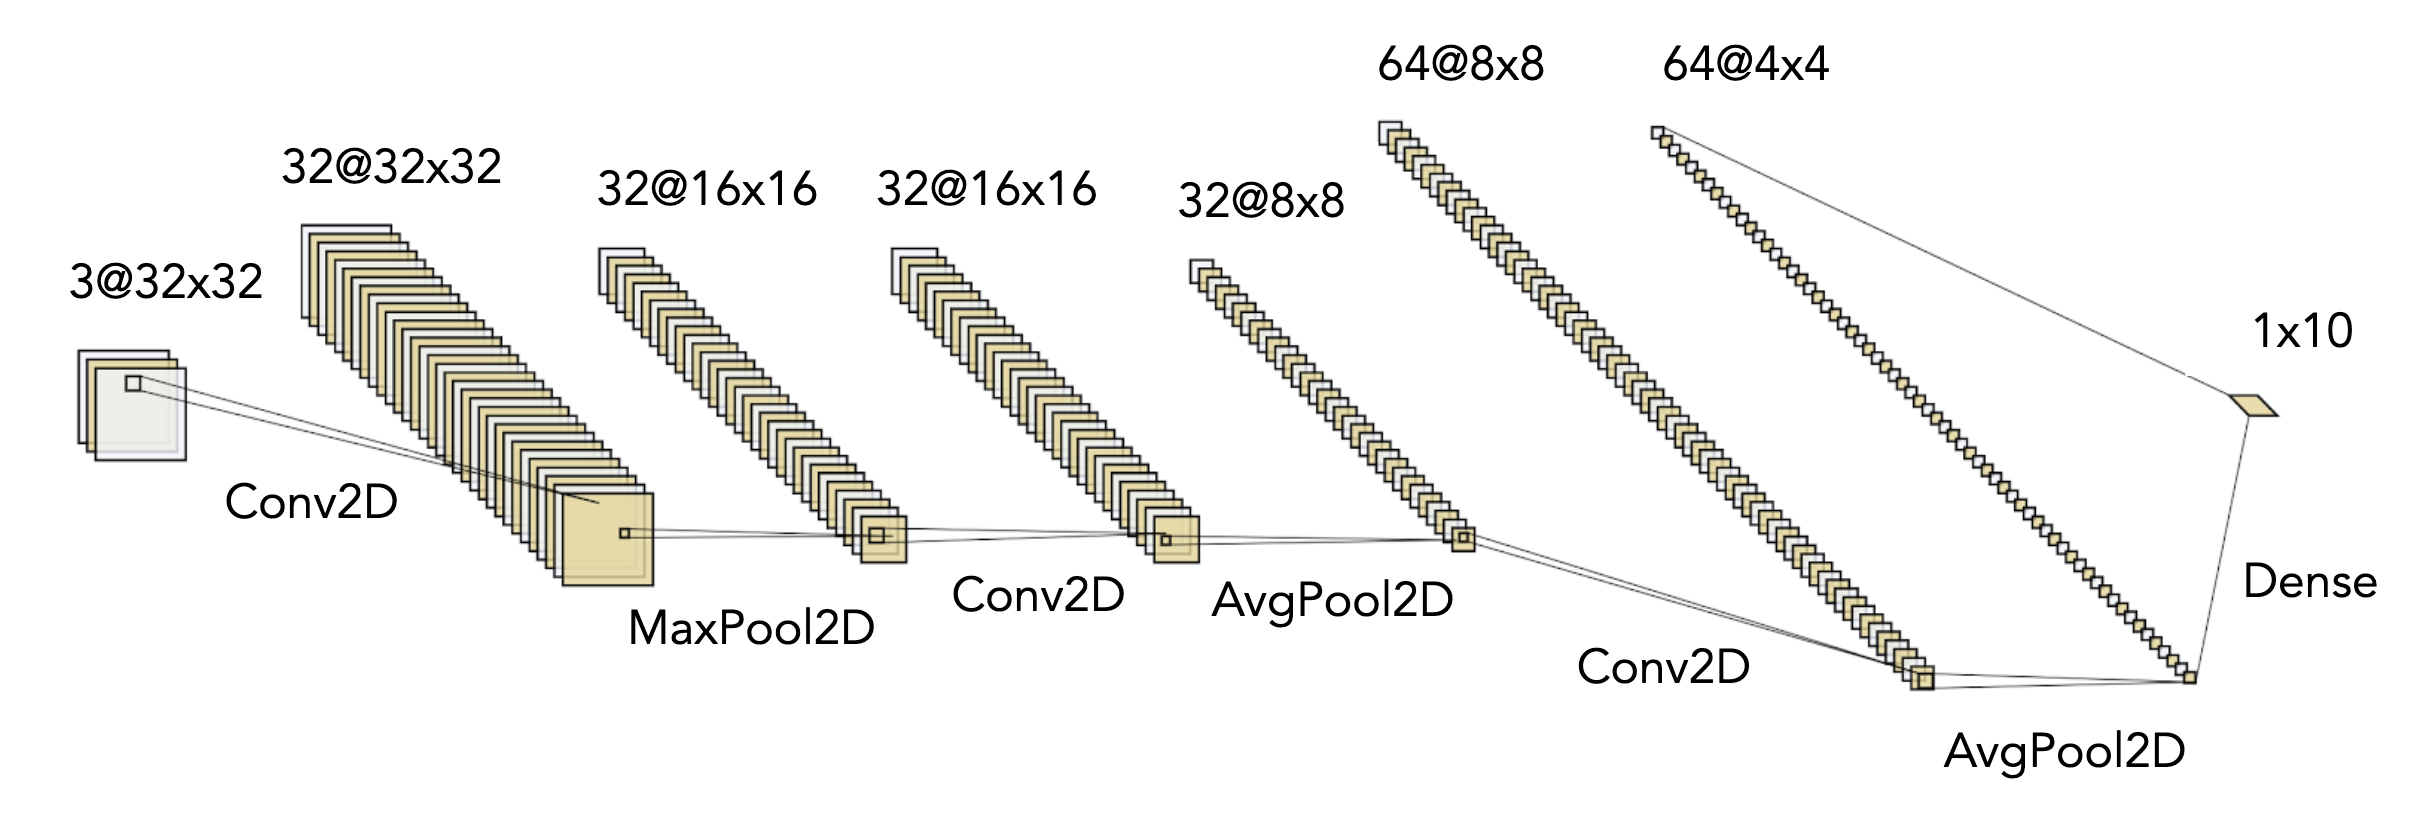
Diagram of CIFAR-10 CNN
Methodology
In our experiments, we use TVM from HEAD (commit 9fa8341), version 5.7.0 of CMSIS-NN (commit a65b7c9a), version 1.16.0 of STM32CubeF7, and GCC from Arm’s GNU Tools for Arm Embedded Processors 9-2019-q4-major 9.2.1 toolchain (revision 277599). The host machine used in our experiments runs Ubuntu Linux 18.04.4 LTS and sports an AMD Ryzen Threadripper 2990WX 32-Core Processor with 62GB of RAM. All evaluation scripts for this blogpost are contained in this repo.
Arm-Specific Optimizations
With CMSIS-NN, the first convolution maps to their RGB convolution implementation (specifically for usage in input layers) and the latter two map to their “fast” convolution implementation. We felt our performance was close enough for the RGB convolution after the earlier generic optimizations, but were left unsatisfied with our fast convolution results. Luckily, Arm released a paper describing optimizations used in CMSIS-NN, and we found they are getting massive speedups from SIMD intrinsics. In the paper, they present a matrix multiplication microkernel that uses SIMD intrinsics (figure below). While we could add first-class support for the intrinsics in TVM’s code generation facilities—and this is likely the best move in the long run—TVM offers tensorization as a “quick-and-dirty” solution to supporting SIMD.
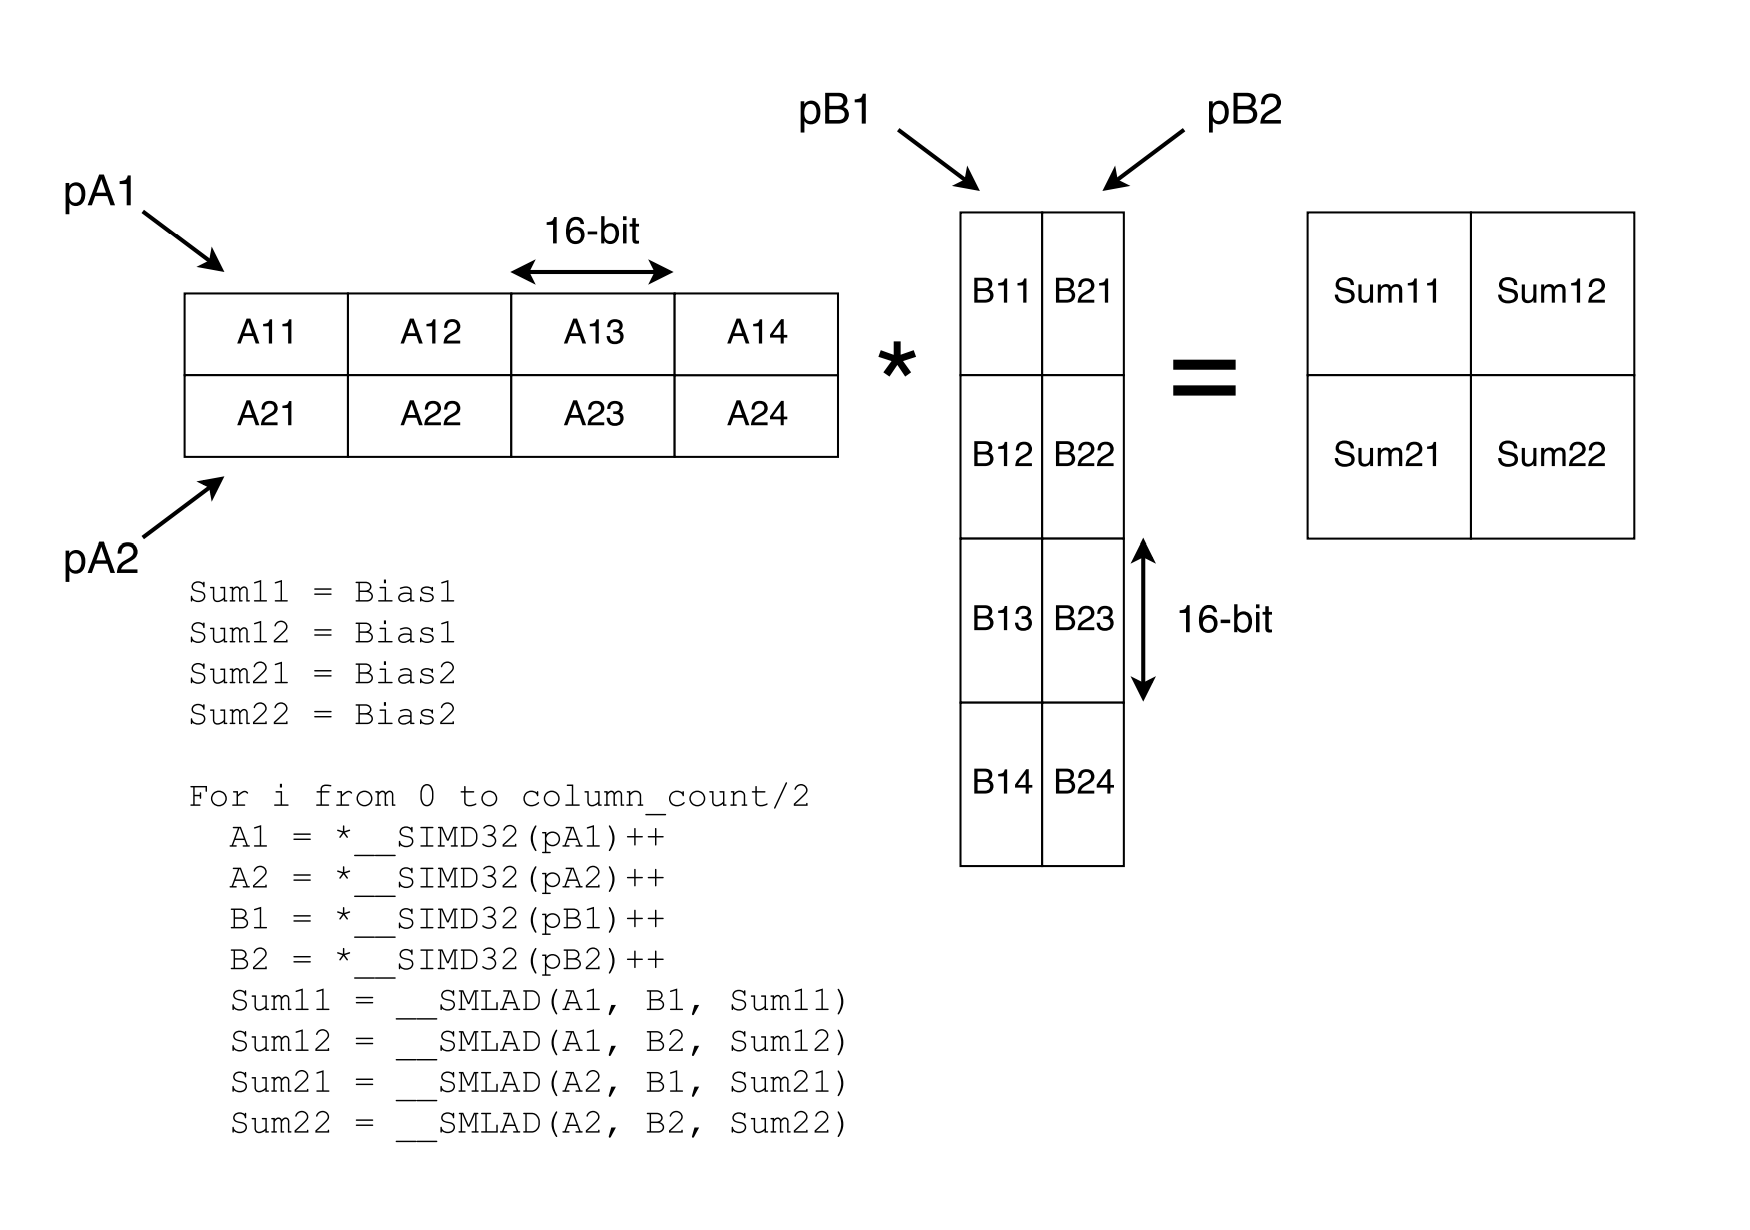
Diagram from CMSIS-NN paper showing a 2x2 matrix multiplication microkernel
Tensorization works by defining a microkernel that can be inserted into the innermost loop of a TVM operator. Using this mechanism, adding SIMD support for the Arm board was as simple as defining a microkernel in C (found here) that mirrored the implementation in their paper. We defined a schedule that used this microkernel (found here), autotuned it, then got the “µTVM SIMD tuned” results.
While we were able to use the SIMD microkernel for direct convolution, CMSIS-NN uses what they call “partial im2col” as their implementation strategy, which offers a tradeoff between performance and memory usage. Instead of manifesting the entire im2col matrix at once, partial im2col generates only a few columns at a time. Then, with each batch, they can send the matrix to their SIMD matmul function.
Our hypothesis was that, among other optimizations, we could find the optimal batch size via autotuning. In practice, we found partial im2col to be significantly slower than our direct convolution implementation, so we don’t include it in the rest of our results.
There are certainly other optimizations we could pull from CMSIS-NN to close the gap even further:
- Batch expansion of
int8weights intoint16, to cut down on duplicate expansion for SIMD - Splitting convolution into 3x3 tiles to reduce padding checks
But our goal in this blog post is to show the broad strokes of what can be done with µTVM. Even so, it’s not a competition, because CMSIS-NN (and any other hand-optimized library) can plug directly into TVM using the Bring Your Own Codegen framework.
End-To-End
CIFAR-10
After exploring optimizations for convolution, we set out to measure their effects on end-to-end performance. For the Arm board, we collected untuned results, results that were tuned without any use of SIMD, results that were tuned with SIMD, and results using CMSIS-NN. For the emulated host device, we only collected untuned results and generic tuned results.
https://github.com/areusch/microtvm-blogpost-eval
int8-quantized CIFAR-10 CNN comparison on an Arm STM32F746NG (re-posted from above)
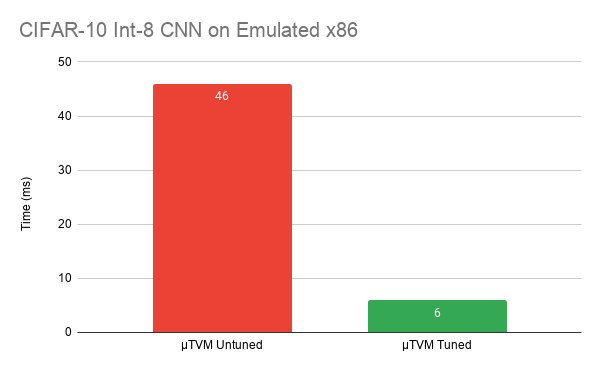
int8-quantized CIFAR-10 CNN comparison on µTVM’s emulated host device
On the Arm STM32-series board, we were able to improve performance by ~2x compared to the initial untuned operators, and we achieved results much closer to CMSIS-NN. Additionally, we were able to significantly improve performance on the host emulated device. Though the x86 numbers don’t mean much, they show we can use the same infrastructure (µTVM) to optimize performance on vastly different architectures.
Stay tuned in the future for more end-to-end benchmarks as we scale this approach out more broadly.
Self-Hosted Runtime: The Final Frontier
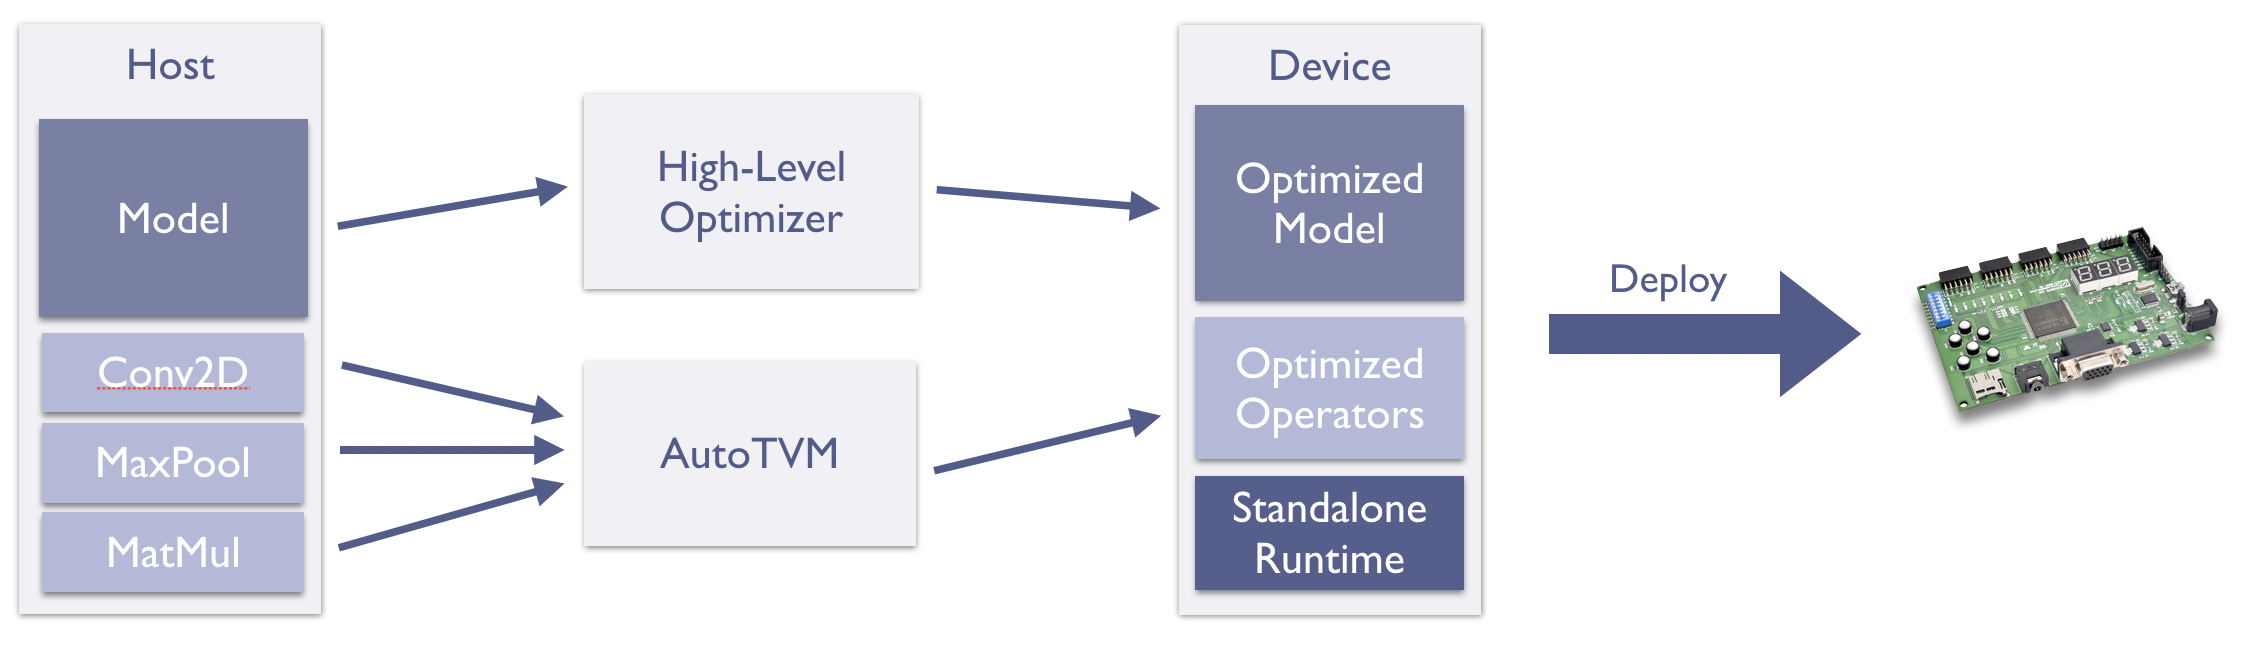
The envisioned µTVM optimization and deployment pipeline
While end-to-end benchmark results are already obtainable with the current runtime as we demonstrated above, deployment of these models in a standalone capacity is currently still on our roadmap. The gap being that the AutoTVM-oriented runtime currently relies on the host to allocate tensors and to schedule function execution. However, to be useful at the edge, we need a pipeline through µTVM that generates a single binary to be run on a bare-metal device. Users will then be able to easily integrate fast ML into their applications by including this binary in their edge application. Each stage of this pipeline is already in place, and now it’s just a matter of gluing it all together, so expect updates from us soon on this front.
Conclusion
MicroTVM for single-kernel optimization is ready today and is the choice for that use case. As we now build out self-hosted deployment support we hope you’re just as excited as we are to make µTVM the choice for model deployment as well. However, this isn’t just a spectator sport - remember: this is all open source! µTVM is still in its early days, so every individual can have a great deal of impact on its trajectory. Check out the TVM contributor’s guide if you’re interested in building with us or jump straight into the TVM forums to discuss ideas first.
Acknowledgements
None of this work would have been possible, if not for the following people:
- Tianqi Chen, for guiding the design and for being a fantastic mentor.
- Pratyush Patel, for collaborating on early prototypes of MicroTVM.
- OctoML, for facilitating the internships where I have been able to go full steam on this project.
- Thierry Moreau, for mentoring me during my time at OctoML.
- Luis Vega, for teaching me the fundamentals of interacting with microcontrollers.
- Ramana Radhakrishnan, for supplying the Arm hardware used in our experiments and for providing guidance on its usage.